Blood, Sweat, and Sawdust

Going against the grain

Category: Hand Planing

Roubo Legs: Squaring End-Grain

There’s a bit of stigma when it comes to squaring end-grain.  It really isn’t all that difficult.  Just follow the same rules you do for long-grain and make sure you have a sharp plane iron.  The real trick is ensuring exact, crisp layout.

Knifing in the line

Knifing in the line

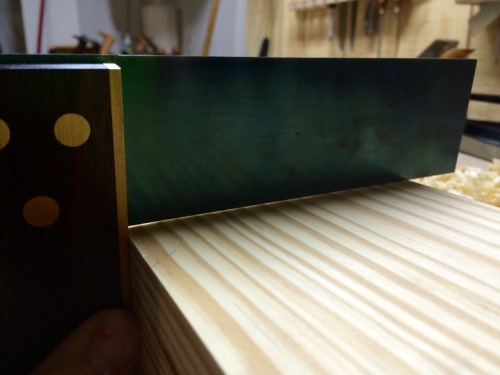
Start by knifing in your line using an accurate square.  Assuming your board is 4-square, your line will be perfectly perpendicular.  Here are some tips to ensure your layout lines meet perfectly as you move around your board:

  1. Always reference your square against your true face or true edge.
  2. Ensure that you’re holding your square securely against your stock.  I like to place my thumb in the center of the square stock and a finger on the blade.
  3. Start your knife line with two very light passes, followed by one or two heavy passes.  This will ensure that you establish your line without applying too much lateral pressure to your square.
  4. Ensure that the bevel of your knife is towards the waste side of your board.
  5. As you move from one face to another, place your knife in the previous line and slide the blade of your square up to the knife.
Increase visibility with a mechanical pencil

Increase visibility with a mechanical pencil

Create a trench using a chisel

Create a trench using a chisel

Once I’ve established my knife line, I like to go back over it with a fine mechanical pencil.  The effect is subtle, but makes the line more visible.  I then follow up by chiseling out a small grove on the waste side of my line.  This will give my saw a small groove in which to ride, and makes the cut easier.

Kerf in your line with a small back saw

Kerf in your line with a small back saw

Once, I’ve chiseled out a groove, I establish a saw kerf all the way around the stock with a fine backsaw.  This will help keep the cut square when I move to a more aggressive panel saw.  From there, I complete the cut on my sawbench with a panel saw.

Squaring the end-grain with a low-angle jack

Squaring the end-grain with a low-angle jack

With the waste removed, I start truing up the end-grain with a low-angle jack plane.  I work in from the outsides to avoid tear out.  I approach this exactly like I would long-grain.  I check everything with a square, mark the low spots, and plane the high spots.  I repeat until satisfied.  Once I’ve squared up one end, I mark the leg to final length, and repeat on the other end.

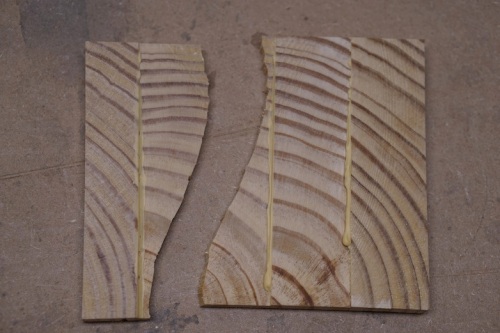
A good glue joint should break along the grain, not the glue line

A good glue joint should break along the grain, not the glue line

I like to test my offcuts for a good glue-joint.  The offcut should never break at the glue-line.

Next up, I will cut the tenons for the legs.  I will show you how to do this two different ways.

You can find links to my other Roubo posts here:  Project Index

Jointing Wide Edges by Hand: Companion Video

Some people like to read, others like videos.  So, I made this little companion video for jointing wide edges by hand.  Some people find this a little tricky due to the fact that multiple passes are needed to square the edge to the true face.  I hope you find this useful and entertaining.

Don’t hesitate to leave a comment or suggestion.  Let me know what you think.  Now, get out there and mill some boards.

You can find links to my other Roubo posts here:  Project Index

Roubo Build: Jointing Wide Edges Dead Square

Jointing Wide Edges by Hand

Jointing Wide Edges by Hand

Jointing wide edges can be tricky. Fortunately, I did my research. It was time consuming, but not difficult.  If I can do it, so can you.

Before you joint an edge it’s important that you establish a reference face that is flat, straight, and free of twist. I covered how I accomplished this here: Milling the large beams for the Roubo bench top

Once you’ve established a reference face, it’s important to assess the board.

  • What are the major defects?
  • Is there any significant bow along the length?
  • How out-of-square is the edge?

I don’t worry too much about minor cupping. This will be remedied, by running both sides through the planer.

Checking for Bow Along the Length

Checking for Bow Along the Length

In my case, there was some significant bowing. I measured about 1/16th of an inch in the middle of the board using a 48 inch straight edge. The edge was also significantly out of square. I chose to tackle the bow first. I removed the high-ends of the board by taking overlapping diagonal passes with my No. 7. When I was close, I started taking overlapping passes along the length of the board. Start from the outside and work your way towards the center of the board. I continued until there was less than 1/64th of error.

Take Overlapping Passes from the Outside to the Center

Take Overlapping Passes from the Outside to the Center

With the bow removed, I started working on getting the edge square to my reference face. I reassessed the board and mark the low spots with a pencil. Take a shaving from each edge, being careful to avoid your pencil marks. Then work your way inwards taking full-length shavings. Reassess the board every couple of passes. If you’re lucky, one side will be high for the entire length of the board.

Check the Edge for Square Using a Jointed Face as Reference

Check the Edge for Square Using a Jointed Face as Reference

Avoid Your Low Marks

Avoid Your Low Marks

In my case, the board was square for the first 6 inches on one end, high on the right side throughout the middle, and high on the right side for the last 6 inches. Here is how my routine went.

  1. Take a stopped shaving on the left side until I reach my low spot.
  2. Take another shaving on the left starting just after my low spot on the far end
  3. Take a stopped shaving on the right until I reach my low spot on the far end.
  4. Work my way towards the middle with full length shavings.
  5. Reassess the board and repeat
Don't Forget to Mark Your Jointed Edge

Don’t Forget to Mark Your Jointed Edge

Jointing wide edges sounds complicated, but I can assure you it’s not.  Just go slow and check your work frequently.  Don’t hesitate to ask any questions.  Feedback is welcome!

You can find links to my other Roubo posts here:  Project Index

Roubo Build: How to Joint Wide Edges Dead Square

Jointing the wide edges of the beams that will be used for the Roubo benchtop

Jointing the wide edges of the beams that will be used for the Roubo benchtop

Jointing wide edges can be tricky. Fortunately, I did my research. It was time consuming, but not difficult.  If I can do it, so can you.

Before you joint an edge it’s important that you establish a reference face that is flat, straight, and free of twist. I covered how I accomplished this here: Milling the large beams for the Roubo bench top

Once you’ve established a reference face, it’s important to assess the board.

  • What are the major defects?
  • Is there any significant bow along the length?
  • How out-of-square is the edge?

I don’t worry too much about minor cupping. This will be remedied, by running both sides through the planer.

Checking for straightness along the length of the beam

Checking for straightness along the length of the beam

In my case, there was some significant bowing. I measured about 1/16th of an inch in the middle of the board using a 48 inch straight edge. The edge was also significantly out of square. I chose to tackle the bow first. I removed the high-ends of the board by taking overlapping diagonal passes with my No. 7. When I was close, I started taking overlapping passes along the length of the board. Start from the outside and work your way towards the center of the board. I continued until there was less than 1/64th of error.

When jointing along the length, take overlapping passes starting from the outside

When jointing along the length, take overlapping passes starting from the outside

With the bow removed, I started working on getting the edge square to my reference face. I reassessed the board and mark the low spots with a pencil. Take a shaving from each edge, being careful to avoid your pencil marks. Then work your way inwards taking full-length shavings. Reassess the board every couple of passes. If you’re lucky, one side will be high for the entire length of the board.

Checking for squareness of the edge using the face as a reference

Checking for squareness of the edge using the face as a reference

Stop planing just before you reach your low marks

Stop planing just before you reach your low marks

In my case, the board was square for the first 6 inches on one end, high on the right side throughout the middle, and high on the right side for the last 6 inches. Here is how my routine went.

  1. Take a stopped shaving on the left side until I reach my low spot.
  2. Take another shaving on the left starting just after my low spot on the far end
  3. Take a stopped shaving on the right until I reach my low spot on the far end.
  4. Work my way towards the middle with full length shavings.
  5. Reassess the board and repeat
Mark out your edge with an arrow that points to your reference face once you achieve a square edge

Mark out your edge with an arrow that points to your reference face once you achieve a square edge

It sounds complicated, but I can assure you it’s not.  Just go slow and check your work frequently.  Don’t hesitate to ask any questions.  Feedback is welcome!

You can find links to my other Roubo posts here:  Project Index

Roubo Build: Rough Milling the Beams for the Bench Top

Rough milling always starts with my trusty Jack plane

Rough milling always starts with my trusty Jack plane

Rough milling large beams by hand, can be very intimidating. I had a few boards slip during glue-up and was afraid it would take forever to correct. Fortunately, a sharp jack plane with a cambered iron made quick work of the rough milling for the Roubo bench top.

Glue up slippage

Glue up slippage

I started by planing with the grain until I leveled out any misaligned boards.  I would usually start planing across the grain, but in this case I could remove the same amount of material in one long pass with the grain as I could several short strokes across the grain.  In the picture above, you can how some of the boards slipped during glue up.  I should have taken more effort to keep the boards properly aligned during the glue up.

Mark out your board

Mark out your board

Once I had leveled out the high boards, I marked out the entire beam with pencil.  This will allow me to track my progress.  Be sure to mark from edge to edge.  Now it was time to get to work.  I hope you ate your Wheaties!

Planing cross grain is particularly good at removing cupping

Planing cross grain is particularly good at removing cupping

Next, I start flattening the beam by planing across the grain.  This is particularly good at removing cupping.  These beams are just over 5 inches wide, so it would be easy to round over the edges planing 90 degrees to the grain.  Instead, I planed down the length at 45 degrees one way, and back down the other way.  My iron is heavily cambered and leaves a visibly scalloped surface.  That’s okay.  All I am shooting for is a face that’s flat and straight enough to run through the planer.  It does not need to be super smooth.  I continue until all of my pencil marks have been removed.

Ultimately, I just want to make sure that the surface is straight and free of any bumps.  You can check for any bumps along the length of your plank by using a straightedge or the blade of a square.

The winding sticks are showing a fair amount of twist

The winding sticks are showing a fair amount of twist

The next task is to check the beam for twist using a pair of winding sticks.  The winding sticks will exaggerate the twist and tell you where your high spots are.  I like to keep one stick stationary at one end of the board, and run the other down the length, checking in 3 or 4 places.  In this case, I noted that the rear stick read high on the right for the entire length of the board.  Instead of removing material from the entire length, it was easier to remove a small amount of material from the front left, to match the rest of the board.

The twist has been removed.

The twist has been removed.

Checking for Bow Along the Length

Checking for Bow Along the Length

Once you have your plank flat and free of twist, you need to ensure that it’s reasonably straight.  I do this, by using the longest straight edge I have.  In this case, it was a 4 foot level I know to by reasonably straight.  Be sure to check in several places.  I was lucky.  This board was nearly dead straight.  However, if you have a bump or concavity, it’s just a matter of marking and removing the high spots.

I didn’t feel the need to break out the No. 7 for this task.  Running the beams through the planer will produce an parallel surface that is straight, free-of-twist, and smooth.  It’s just a matter of flipping the board over and getting the other side smooth.  The No. 7 will come in handy when flattening the bench top after the final glue up.

Please, let me know if you have any questions.  I will cover the rest of the milling process and the final glue up of the top in a future article.  Don’t miss it.

You can find links to my other Roubo posts here:  Project Index

Roubo Build: Milling the Beams for the Top

Trusty Jack

My trusty Type 11 Stanley No. 5, made quick work of milling these beams by hand.

Milling large beams by hand, can be very intimidating. I had a few boards slip during glue-up and was afraid it would take forever to correct. Fortunately, a sharp jack plane with a cambered iron made quick work of the rough milling for the Roubo bench top.

Glueup Slippage

These boards slipped during glue-up

I started by planing with the grain until I leveled out any misaligned boards.  I would usually start planing across the grain, but in this case I could remove the same amount of material in one long pass with the grain as I could several short strokes across the grain.  In the picture above, you can how some of the boards slipped during glue up.  I should have taken more effort to keep the boards properly aligned during the glue up.

Marking out the beams

Marking out your work, allows you to track your progress

Once I had leveled out the high boards, I marked out the entire beam with pencil.  This will allow me to track my progress.  Be sure to mark from edge to edge.  Now it was time to get to work.  I hope you ate your Wheaties!

Planing Cross Grain

Planing cross grain will flatten the board. It’s particularly good at remove cupping.

Next, I start flattening the beam by planing across the grain.  This is particularly good at removing cupping.  These beams are just over 5 inches wide, so it would be easy to round over the edges planing 90 degrees to the grain.  Instead, I planed down the length at 45 degrees one way, and back down the other way.  My iron is heavily cambered and leaves a visibly scalloped surface.  That’s okay.  All I am shooting for is a face that’s flat and straight enough to run through the planer.  It does not need to be super smooth.  I continue until all of my pencil marks have been removed.

Ultimately, I just want to make sure that the surface is straight and free of any bumps.  You can check for any bumps along the length of your plank by using a straightedge or the blade of a square.

The winding sticks are showing a fair amount of twist

The winding sticks are showing a fair amount of twist

The next task is to check the beam for twist using a pair of winding sticks.  The winding sticks will exaggerate the twist and tell you where your high spots are.  I like to keep one stick stationary at one end of the board, and run the other down the length, checking in 3 or 4 places.  In this case, I noted that the rear stick read high on the right for the entire length of the board.  Instead of removing material from the entire length, it was easier to remove a small amount of material from the front left, to match the rest of the board.

No twist

No twist

Checking for bow

Checking for bow

Once you have your plank flat and free of twist, you need to ensure that it’s reasonably straight.  I do this, by using the longest straight edge I have.  In this case, it was a 4 foot level I know to by reasonably straight.  Be sure to check in several places.  I was lucky.  This board was nearly dead straight.  However, if you have a bump or concavity, it’s just a matter of marking and removing the high spots.

I didn’t feel the need to break out the No. 7 for this task.  Running the beams through the planer will produce an parallel surface that is straight, free-of-twist, and smooth.  It’s just a matter of flipping the board over and getting the other side smooth.  The No. 7 will come in handy when flattening the bench top after the final glue up.

Please, let me know if you have any questions.  I will cover the rest of the milling process and the final glue up of the top in a future article.  Don’t miss it.

You can find links to my other Roubo posts here:  Project Index

Handtool Basics

I’ve been meaning to spend more time developing my hand tool skills, and I thought it would be a great opportunity to write about the process. I find that the writing process helps me obtain a deeper understanding of the topic being discussed. Hopefully, it will provide insight to someone else along the way.

I plan to start with the basics and progress to more complicated tasks. I will include everything from sharpening and milling to joinery. I will detail my process and include lots of photos. My goal is to blog atleast one post per week regarding the topic. So, follow along and join in. I would love to hear your questions and suggestions.

Rabbet Season

Image

My current workbench has served me well, but it’s severely lacking in its work holding ability. I recently discovered that I had no way to efficiently hold a work-piece while hand-planing rabbets. I had no way of holding the piece without the fence on my skew rabbet plane getting in the way. I wanted to drill a new dog hole closer to the edge, so that the fence would hang off the side while planing. Unfortunately, this isn’t possible due to the threaded bolts that secure the rails to the legs.

Since I can’t really afford to build a nice Roubo bench at the moment, I set out to find a simple, cost-effective solution. What I came up with was a planing stop with a fence on the back edge that extends the length of the stop. This allows me to set my work piece on top and use the fence and a clamp to secure everything. I can align the shoulder with the end of the fence so that nothing gets in the way while planing. It also works great for face jointing wide stock.

ImageImage

Children’s Foot Stool

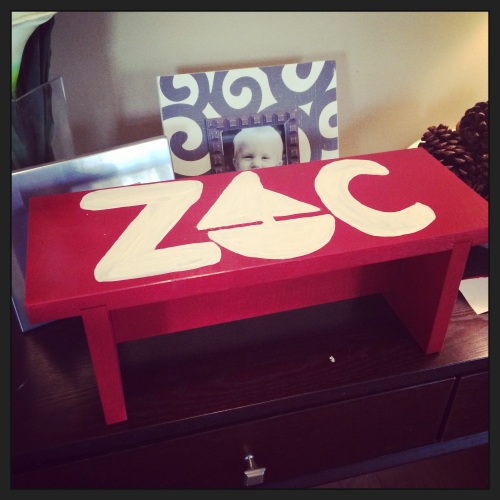
My wife recently informed me that our two year-old son was in need of a small foot stool to help him learn how to brush his teeth.  I took this as an opportunity to practice a few skills I haven’t yet mastered.  I decided to make the stool from soft-maple.  I used a very simple design and focused on the joinery.  The legs attach to the top via hand-cut dados, and the legs are connected via a stretcher that uses mortise and tenon joinery.  This was my first attempt at through mortises.  The results were sufficient but could have been cleaner.  I would have preferred a shellac finish, but my wife insisted on painting the stool to match the bathroom.  I think it turned out great.


photo 1


photo 4

Hand Plane Tune-up

Due to a limited budget, I started my hand tool journey by refurbishing some old tools.  Among these, was an old Stanley no. 5C that I received from my grandfather.  Despite finding it on the side of the road, it was still in relatively good condition.  It had lots of surface rust, but the sole was reasonably straight, so I decided to give it a shot.

After an initial tune up, I put it to work against some pine.  I was astonished at how well it cut.  However, my excitement was short lived.  Putting it to work on an oak board revealed just how inadequate my restoration had been.  The blade would jam, jump, and skitter across the board.   I was determined to figure out where I had gone wrong.

I scoured the Internet for solutions.  I fully disassembled the plane, and checked every part for possible defects.  It seemed as though I found something wrong with every part.  I fiddled and fiddled, until the tool performed flawlessly.  It was a frustrating journey, but wisdom was gained from the experience.

If you’re having issues with the performance of your plane, don’t overlook the following:

1) Is the sole truly flat?  Mine would rock slightly on a flat surface.
2) Are there any gaps between the blade and cap iron?  Hone the cap iron.  Play with the distance.  Make sure the nut is as tight as you can get it.
3) How cleanly does the lever cap mate?  Is it tight enough?  Hone the lever cap
4) How sharp is the blade?  Can it easily shave the hair off the back of your arm?  If not, work on your sharpening.
5) Is the face of the frog flat?  Flatten it.  Does it rock in the sole with the screws backed off?  Check all four corners
6) Are the totes tight?  Back off the short screw in the rear tote.  Does is wobble?  I had to cut some threads off the long screw.

Don’t leave any stone unturned, and don’t give up.  Happy planing.