Blood, Sweat, and Sawdust

Going against the grain

Category: Outdoor Furniture

The Big Green Egg Table: Part 2

If you haven’t already, check out The Big Green Egg Table: Part 1.  Otherwise, continue reading for more of the cedar Big Green Egg Table build.
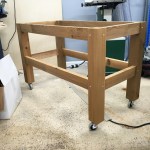
The Top

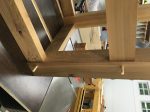
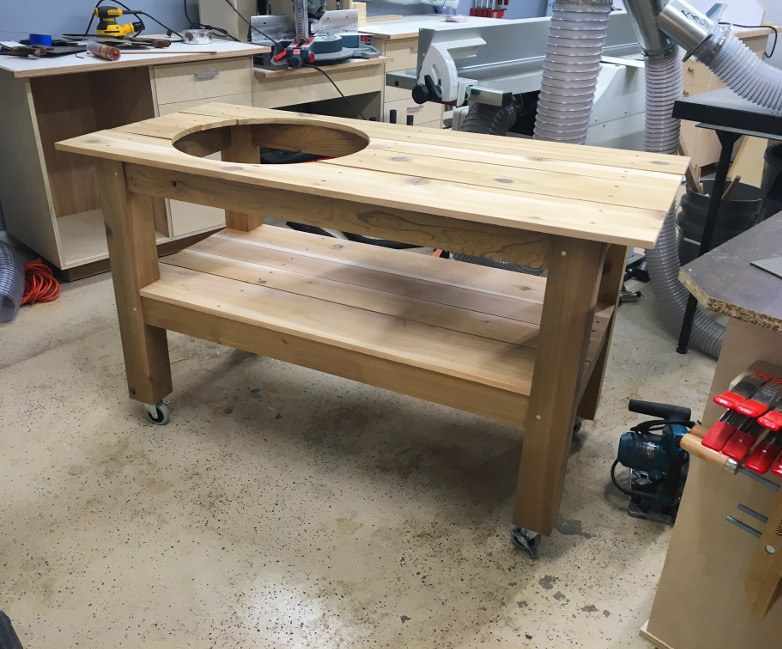
With the base complete, I moved on to the top and shelf.  Consequently, I struggled with how best to attach them.  While pocket holes would conceal the screws, drilling through the boards would increase strength.  Ultimately, I decided to go through the boards.  This allowed me to use a longer screw.

IMG_5637

Next, I cut the circular hole for the Big Green Egg.  First, I determined the center of the circle.  Then, I marked the circumference using a shop-made jig, nailed to the center point.  Finally, I cut out the hole using a jig saw with a fine blade.  I cleaned up with cut with an orbital sander.
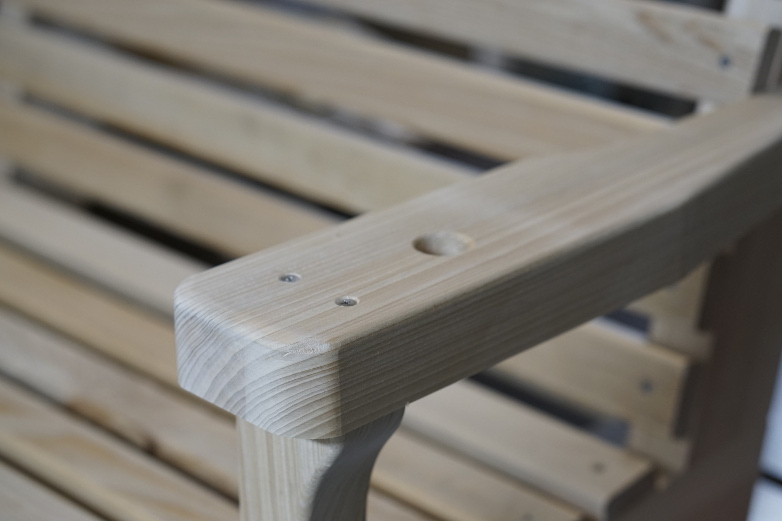
IMG_5650

The End Result

This left me with finishing the table.  I cleaned up the surfaces with the sander, and applied a couple of coats of clear Danish oil.  Danish oil is super easy to apply, dries quickly, and is great for outdoor furniture.

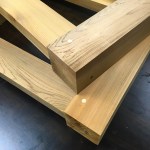
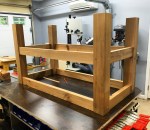
I’m very happy with the result, and I think my customer is as well.  I think the mortise and tenoned base really adds a lot to the look and strength of the table.  I hope that this supplies him with many years of good use.

Stay tuned for more news and projects.


The Big Green Egg Table: Part 1

When you have a good friend who helps you a lot, you take care of them.  So, when my good friend asked if I could build him a Big Green Egg table, I said, “of course”.  Unfortunately, I could only offer my services at cost.  So, I put a little extra effort into making this table as nice as possible.

The Base

Instead of making this table out of construction lumber, I went with cedar.  I built the legs from rough 16/4 stock and the rails from 8/4 stock.  I also used draw-bored mortise and tenon joinery.  This makes the table stronger and more attractive than the average BGE table.

After milling up the rough lumber, I made quick work of the mortises in the legs.  I mortised the legs with a plunge router and my new mortise jig.  Then, I cut the tenons on the table saw with a dado stack.

With the joinery cut, I test fit all the joints and made any adjustments.  Then, I drilled the draw-bore holes in the legs and tenons.  For a complete write-up on the technique , check out my earlier post on draw-boring.  With that complete, it was time to glue up the base.

Next, I attached casters to make this table mobile.  Then, I added braces to the upper and lower rails.  The upper brace provides and anchor for the top slats after I cut the hole for the grill.   The lower brace strengthens the area where the grill sits.

All that’s left is the top, shelf, and delivery.  Check out part 2 of the cedar Big Green Egg Table build.

The Cypress Porch Swing

My life is hectic planning for the move.  I’m obsessing over every detail.  I haven’t spent as much time in the shop as I’d like.  However, I did find some time to complete a nice little commission for a friend: a high-back cypress porch swing.

Completed Cypress Porch Swing

I milled the structural components from 8/4 Cypress, and the slats from 4/4 Cypress.  These boards are beautiful.  All of them had tight grain and were completely free of knots.  Most of the boards where 12 inches or wider.  It was a shame to rip them all down.  I used Tite-bond III wood-glue and stainless steel hardware.

Cypress porch swing, half-lap joint

I started by milling up the 8/4 boards.  With the seat and back supports roughed out, I cut the half-lap joints that join the two pieces together.  I did this before cutting the curved profiles.  This made cutting the half-laps on the table saw much easier.  If I ever do this again, I will use bridle joints.

Arms

Support

With the half-laps cut, I cut the curved profiles on the band saw.  I did this before gluing the assemblies together.  Then, I cleaned everything up on the spindle sander.  I also routed a round-over on the top of the arm-rest and the arm-rest bracket.

With the structural components complete, I ripped my 8/4 stock down and routed a round-over on the top of each seat slat.

Sides

Frame

Hardware

Assembly was very straight forward.  I started with the side assemblies.  I screwed and glued the arm rests to their brackets.  Then I bored the holes and counter-sinks for the carriage bolts that will hold the side assemblies together as well as support the chain.

With the side assemblies complete, I started attaching the seat slats.  I started at the top of the back and front, and worked my way inwards.

Arm

With the swing assembled, I bored a hole to accept the swing chain through the arm-rest.  I finished the swing with a quick sanding.  I think it turned out well, and it should last for some time.


An Exterior Wood Finish That Lasts

Adirondack Chairs with Epifanes Marine Varnish

Adirondack Chairs with Epifanes Marine Varnish

About a year ago, I built a pair of Adirondack chairs for a client. I had already built a similar pair of chairs before, but the client wanted a nice exterior finish. I wanted to ensure that they got what they were looking for with as little maintenance as possible. The sun can be harsh.

I scoured the Internet. I reviewed what seemed like hundreds of options. However, I kept running across a particular marine varnish. Enter Epifanes.

The high gloss finish might not be for everyone, but the promises of longevity were there. Thinned down a bit, it was easy enough to apply. Most importantly, the clients seemed happy with the appearance. Yet, concerns of maintenance troubled me.

While visiting family over the weekend, I had the opportunity to check up on the chairs and see how they were holding up. The chairs sit on a porch that recieves a lot of direct sunlight. I was a little worried of what I might find. Fortunately, the finish is holding up great. Despite a year of direct sunlight, the varnish still looks fresh. Not even a hint of hazing.

If you don’t mind the high gloss look, I would highly recommend Epifanes marine varnish.

Epifanes Marine Varnish: An Exterior Wood Finish That Lasts

Epifanes Marine Varnish: An Exterior Finish that Lasts

Epifanes: An Exterior Finish that Lasts

About a year ago, I built a pair of Adirondack chairs for a client. I had already built a similar pair of chairs before, but the client wanted a nice exterior finish. I wanted to ensure that they got what they were looking for with as little maintenance as possible. The sun can be harsh.

I scoured the Internet. I reviewed what seemed like hundreds of options. However, I kept running across a particular marine varnish. Enter Epifanes.

The high gloss finish might not be for everyone, but the promises of longevity were there. Thinned down a bit, it was easy enough to apply. Most importantly, the clients seemed happy with the appearance. Yet, concerns of maintenance troubled me.

While visiting family over the weekend, I had the opportunity to check up on the chairs and see how they were holding up. The chairs sit on a porch that recieves a lot of direct sunlight. I was a little worried of what I might find. Fortunately, the finish is holding up great. Despite a year of direct sunlight, the varnish still looks fresh. Not even a hint of hazing.

If you don’t mind the high gloss look, I would highly recommend Epifanes marine varnish.

Exterior Finishes

I’m always reluctant to finish exterior projects that go out to customers. The reason being that nothing lasts for ever in the harsh light of the sun. The amount of maintenance required is often far greater than the customer is willing to endure. Even the best marine varnishes might only last a year or two in direct sunlight.

In light of that, a recent customer requested that I finish a pair of Adirondack chairs. I did my homework and determined that Epifanes Marine Varnish was my best bet. Although expensive, It was easy to apply and includes some of the best UV inhibitors on the market. The results were excellent. The chairs look great and the customer was happy. Only time will tell how long the finish holds up. Fortunately for the customer, the chairs are mostly shaded throughout the day. Here are the results:

securedownload (1)

securedownload

I thinned the finish with normal mineral spirits, and thinned per the directions. I got better results with a foam brush, due to the thick nature of the finish. I ended up applying about 7 coats, lightly sanding between each.

My First Shot at Template Routing

securedownload2

I recently tried my hand a template routing for the first time. I knew I should have listened to that little voice in my head that was telling me to send a test piece through before my work piece. I ruined my work piece as a result of my reluctance and had to start over. Fortunately, I had plenty of spare wood and it didn’t take me very long to get back to where I was.  Here is what I learned from my experience:

1) When you initially cut your piece out (whether with bandsaw or jigsaw), cut as close to the line as possible. The more space you have between the edge of your template and your bit, the more likely you are to experience chip out.

2) Like with most other tools, cut with the grain, not against it.  This will typically mean that you need to cut down the curve. You may need to flip the work piece at some point.

3) If using tape to secure your work piece to the template, make sure that it’s secure. This is where I really went wrong. While cutting the arms for a pair of Adirondack chairs, my double-sided tape began to slip. This allowed my work piece to be pulled into the bit.  This is the result:

securedownload1

Warm Weather Means Outdoor Furniture

It’s getting warm, which means I’ll likely be building lots of outdoor furniture. Here I’m using Cypress to build a pair of Adirondack chairs for a new customer. They will be based off of Norm Abram’s classic design, but differ in a few key details. This time I will be using a template on a router table to cut all of my curved pieces to size. I hope that this will speed up the build process. Once all of the parts are cut to size, I will assemble the chairs with stainless hardware and an exterior wood glue. I will finish them with Epifane’s Clear Varnish. This should help them to hold up to the elements for decades.

photo 1

Cypress is great for outdoor furniture.  It’s naturally bug and rot resistant, and it’s also light weight.  My first pair of Adirondack chairs have been sitting in the backyard for about a year now.  They are in direct contact with the wet ground, and in full sunlight.  Despite being unfinished, they show now signs of giving up.

photo 2

I created a template out of mdf (left).  I will use it to cut the rough sawn pieces (right) to final dimensions.  This will ensure that all pieces are uniform and greatly speed the build process.

Adirondack Chairs

Things have been quiet here for the last few weeks.  I fully intend to update this blog on a more regular basis, but I’ve been working on the design of my Adirondack chairs.  They are heavily influenced by the design Norm Abrams used in the New Yankee Workshop.  I have made a few changes to the design, and plan on making a few more on subsequent chairs.  While they don’t rely on any traditional joinery, they were still a lot of fun to make.  This pair was made entirely from Cypress, using stainless steel hardware.  All of the screws will be hidden by wooden plugs.  Overall, I am very pleased with the design.  The chairs look great and are very comfortable.  It’s too bad the weather’s starting to get cold.

photo

Children’s Picnic Tables

I got this idea from the husband of one of my wife’s friends. After making one for my son and seeing how much he loved it, I decided to start offering them to others. They are made from solid pine and should last for years if properly treated. Contact me for more information.

20130814-195643.jpg