Blood, Sweat, and Sawdust

Going against the grain

Category: News

The Bogg’s Shave Horse: Ratchet and Key

The placement of the ratchet key worried me.  If installed incorrectly, the lower jaws won’t work properly on the shave horse.  Unfortunately, I hadn’t received any good instruction on how to locate it.  In the end, I devised a good solution that I think will help anyone building a similar shave horse.  Keep reading to see how I did it.

Ratchet and Key

First, I built the ratchet, and installe the guide block.  This shouldn’t require much explanation.  Unfortunately, I hurried this part of the build.  As a result, it ended up much more difficult than it should have been.  Don’t be like me!

Next, I used a set of drafting curves to sketch out the shape of my ratchet key.  It needed to be long enough to easily reach the handle.  Mine ended up 8 inches long and about 4 inches high.  Then, I cut the key on the band saw and cleaned it up on the spindle sander.  I left extra material on the pin end, to ensure a tight fit in the ratchet.

To find the correct location for the key, I did the following:  First, I marked the center-line on the key and the point for the dowel.  Then, I placed the key on the base, and transferred the center-line to the base.  I also used the notches in the ratchet to mark the pin on the key (this is why I left extra material on the key, earlier).  Finally, I transferred the line on the base down both sides.

Next, I removed the ratchet and inserted the key.  I carefully determined how low I wanted the key, and marked a second line.  Then, I measured the distance between the second line, and the horizontal line for my dowel.  This determines how far down the dowel will pass through the base.  Finally, I transferred this measurement down each side of the base and drilled my holes.

I did not glue in the dowel.  I want to be able to remove it later, if necessary.  Instead, I waxed the dowel and drove it through with a dead-blow mallet.  Next, I will tackle the treadle and seat.  Stay tuned.

Making a Boggs Inspired Shave Horse

Chair making deeply interests me.  The sensuous curves of a Maloof rocker and practicality of a ladder back captivate me.  Despite this, I have yet to build more than a few Adirondack chairs.  So, I signed myself up for Jeff Miller’s chair building class in November.  In the meantime, I decided to learn all I could about chair making.  Along the way, I determined that I would need a shave horse.

You use a shave horse to hold chair parts for shaping with a draw knife or spoke shave.  It consists of a seat and clamping apparatus.  A good shave horse allows the user to easily adjust clamping pressure, while maintaining a comfortable seating position

So, I scoured the Internet for information.  Eventually, I decided to build a horse similar to one Brian Boggs designed several years ago.  In case you didn’t know, Brian Boggs is a talented chair maker from Asheville, North Carolina.  His shave horse sits on three legs, uses a foot operated treadle, and clamps with an adjustable lower jaw.  Additionally, the user builds the device to suit his or her own body.

Shave Horse

I have already milled most of the lumber.  I have shaped the sides and started on the legs.  Once the base is complete, I will install the jaws, treadle, and seat.  If all goes well, I should complete the horse within a week.

Stay tuned for progress.

The Tree Journal

The Tree Journal

I have wanted to start a tree journal for some time.  So, I am finally getting around to doing just that.  Consequently, I will write a new post every week spot-lighting a specific species of tree.  My goal is to educate myself.  However, I hope I will help some of you as well.

In each post, I will detail the tree’s description and their specific characteristics for woodworking.  Most trees will be ones that are locally available to me in the southeastern region of the United States.  Additionally, I will provide a link to each article below.  So, this page will serve as a sort of index.

Stay tuned for more.  If there are any trees you would like detailed, don’t hesitate to let me know.

Missing the Woodworking in America Action

I planned on attending Woodworking in America this year.  It was high on my priority list.  Unfortunately, it just wasn’t in the cards.  I spent all my coin (and then some) on the shop build earlier this year.  I don’t regret a thing.  Maybe, I will make it next year.

Fortunately, I get to spend the morning with my best buddy.

img_1196

To all my friends attending: have fun, be safe, and bring me back something!

Sheet Metal Screws vs Rivets for Ductwork

While finishing the ductwork for my dust collection system, I ran into a dilemma.  The sheet metal screws protrude into the ducting more than I was comfortable with.  I used the shortest screws I could find.  However, the length of the screws concerned me that chips might snag on screws and lead to bigger issues.

The alternative is pop rivets.  They look much nicer and protrude less into the interior of the ducting.  The only major drawback is that they are slightly more permanent.  In practice, they aren’t that difficult to remove.  Select a drill bit that’s about the same size as the rivet head and drill it off.  To install, simply drill a hole that’s the same size as the rivet.  Insert the rivet post into the gun, the head into the hole, and then squeeze the handle until the post snaps off.

All you need is a rivet gun and some pop rivets.  The rivets I used are 1/8-inch by 1/8-inch.

Rivets for Ductwork

In the end, I definitely prefer rivets for duct work.  Just make sure you’re comfortable with everything before installing them.

Stay tuned.  I’m about 95% complete with my ductwork and should have another post in the next day or two.

For the rest of the workshop build, check out the garage workshop build index.

Shop Update

IMG_2564

I spent the last few days getting the walls ready for paint.  It has taken more time than I initially expected.  Doesn’t everything?

The paint on the two existing walls was in bad shape.  It was peeling badly at the bottom along the entire length.  I used a scraper to remove most of the easy stuff.  Then I sanded the edges down and mudded over the transition.  Now, all that’s left is to paint and trim out the room.  I should have that done by the end of the weekend.

It’s important that I get this done quickly, because I have a special delivery coming on Tuesday.  More on that later.

Oh, I also received my Mitsubishi Mr. Slim.  Good weather ahead.

IMG_2568

For the rest of the workshop build, check out the garage workshop build index.


Workshop Update: Patience

FullSizeRender12

Patience isn’t something I do well.

The weather isn’t cooperating, so I haven’t mudded the drywall.  I can’t paint until the drywall is complete.  I haven’t ordered air-conditioning because the paint isn’t complete.  The list goes on from there.

The forecast is looking better, but I have other commitments.  Fortunately, I have Monday off and the weather looks quite nice.  If all goes well, I will be able to make some headway.

In the meantime, I’ve been doing what I can: cleaning up, planning dust collection, etc.

Stay tuned.

For the rest of the workshop build, check out the garage workshop build index.


Workshop Update

There haven’t been any large developments over the last week.  However, there have been several small ones.

With the help of my lovely wife, I hung my air filtration unit.  We almost died in the process, but we did get it up there.  It was difficult to see above the unit, and we accidentally knocked a couple of the s-hooks loose during the installation.

Air Filtration

After removing the old garage door opener, I discovered signs of arc-flashing on the ceiling receptacle.  I replaced the receptacle and added an extension cord reel.

Extension Reel

I added two additional soffit vents and may add a vent fan to the gable vent.

Soffit Vent

Oh, and the drywall arrived.  I’ve started hanging sheet rock and I’ve already learned a few tricks.  Stay tuned for the full write-up.

Drywall

For the rest of the workshop build, check out the garage workshop build index.

Power for the Shop: Workshop Electrical on a Budget

Garage Workshop Electrical

Houston, we have power!

The new garage workshop finally has real power.  I will never have enough outlets.  However, I did my best to ensure adequate coverage, while sticking to a budget.  I’m relatively proficient with residential electric, so I did most of the leg work to keep costs down.  Then, I hired an electrician to check my work, connect the breakers, and test the outlets.

I’ll share with you exactly what I did.  I hope this will help others proceeding along a similar path.

Warning: I am not a certified electrician.  Proceed at your own risk.  Consult your local code and a qualified professional before starting any workshop electrical projects!

First, I marked my box locations.  I planned this out earlier here: Workshop Planning

Then I made a story stick from a scrap 2×4.  I used this to mark the height of each box and my horizontal wire runs.  I planned the bottom of each box 50″ from the ground.  This will allow me to clear any benches and full-sized sheets of plywood laid against the wall.

New Work Box-Web

Once everything was laid out, I secured each of my boxes to the proper stud.  I used adjustable boxes.  This allows me to dial in the box perfectly once drywall is up.

Next, I drilled a 3/4″ hole through the studs using a cordless drill and an auger bit.  Finally, I drilled similar holes through to top plate to route the wiring through the attic.

Electrical Rough Wiring

Staples-Web

I pulled my horizontal wire, taking care to leave 12″ of extra cable at each box.  Then, I secured each wire using a staple within 12″ of the box and at least every 4.5′ after that.  Next, I began the arduous task of pulling wire through an attic filled with obstacles and engineered trusses.  Blech!

Rats Nest-Web

Running Wires Across Joists

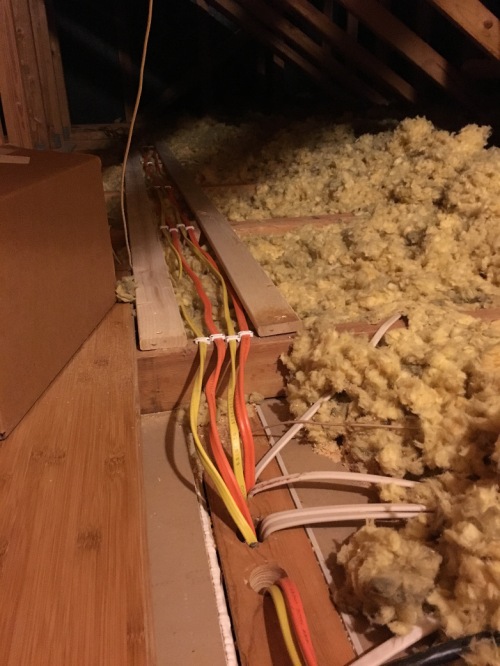
A good part of my runs through the attic are within 7 feet of the access ladder and perpendicular to the joists.  My local code requires that I make a raceway to protect the wires from be trampled on.  I used furring strips, but 2×4’s may have been better.  Straighten out as much of your wire as possible before pulling it into the attic.  Straightening 10/2 NMb wire in the attic is not fun!  I pulled 8 feet of extra wire for all of my circuits to give the electrician plenty of extra wire to work with.

Electrical Pigtails

With the wires ran, I started making up my boxes.  First, I stripped off the wire jacket and removed the paper from the ground wire.  Leave about an inch of jacket remaining in the box.  Then, I stripped about 1″ of sheathing off each wire and made pigtails using scraps.

Double Duplex-Web

With the pigtails made, it was just a matter of connecting all of my outlets and securing them to the box.

Run to AC Disconnect-Web

AC Disconnect Box

The last thing I did before calling the electrician, was connecting the AC disconnect box outside.  I secured the box directly to a stud and used duct seal around the screw holes and cable penetration point to prevent water intrusion.

Connecting Breakers-Web

Connecting all of the circuits to the panel was uneventful.  It only took a few hours and we didn’t encounter anything unexpected.  Everything tested correctly on the first try.  Pulling the cables through the top plate and into the box took the most amount of time.  There wasn’t enough room at the top of the box to insert the cable clamps, so we had to pull them through the top-plate holes on the cable.

Now, I can install insulation in the walls and keep out some of the cold.  Stay tuned!

For the rest of the workshop build, check out the garage workshop build index.


A Serious Garage Door for the Garage Workshop and Other Updates

Garage Door Outside

Did I need a new garage door?  No.  However, adding insulation and conditioning won’t do much good if I kept the drafty uninsulated door that came with the house.

This was a long time waiting.  I ordered the door the day after Thanksgiving.  A representative called me the day before the scheduled installation and informed me that the door was backordered.  No worries.  They upgraded me from the R13 door I had purchased to an R18 door, at no extra charge.

Garage Door Inside

The door sections are two inches thick and filled with polyurethane insulation.  Everything about the door is beefy.  Oh, and the windows are nice too.  I haven’t yet decided if I like the cross inserts yet or not.

Garage Door Assembly

Unfortunately, I couldn’t be there for the installation, but my wife did and excellent job of supervising.  These door sections are very heavy.  I’m not sure how the installer got them into place all by himself.

I am very happy with the new garage door.  It’s of higher quality than I’m used to.  The new seals excel at keeping out the drafts.  The natural light is greatly welcome.  The polyurethane insulation keeps out the noise.  And I’m sure that it will make the mini-split’s job a lot easier down the road.

In addition to the garage door, I was able to frame in a side door and get started on my electrical.  More on that later.

Side Door Framing

Electrical Rough Wiring

For the rest of the workshop build, check out the garage workshop build index.