Blood, Sweat, and Sawdust

Going against the grain

Category: Reviews

Review – The Lie Nielsen Honing Guide

Sharpening is not my favorite task.  I prefer working wood to working tools.  However, now and then you need to grease the machine.  I’m always looking for ways of speeding up the process, so that I can get back to work as quickly as possible.  As a result, I’ve purchased a few sharpening jigs throughout the years.

First, it was the Veritas MKII.  It’s a nice jig, but it has a couple of major weaknesses.  Your blades can skew during use, and using the registration jig slows down the process.  So, I sold the MKII and purchased a cheap Eclipse-style side-clamping jig.  This solved the problem of blade skew and worked well for most plane irons.  However, it never held my chisels square and was poorly made.  I kept the Eclipse, but purchased a Kell honing guide for my chisels.  The Kell jig is beautiful and works well for chisels.  Unfortunately, it is difficult to hold with certain blades.  Additionally, it required two different setups for chisels and plane irons.  Enter the Lie Nielsen honing guide.

img_9405

At first, I hesitated to give it a shot due to its price.  At $125, the Lie Nielsen honing guide is pricey.  Lie Nielsen offers several additional “jaws” to support many different tools.  However, each set costs an extra $25 to $35.  Despite the price of admission, I gave it shot.  I also picked up a pair of their long jaws for use with short irons such as those found in spokeshaves.

The guide comes packed in a small, clear plastic box with a set of instructions.  The box makes a great place to store the guide out of the elements.  So, I kept it.  Everything on the guide is well made.  Lie Nielsen machines all the parts, the bearings roll smoothly, and there is absolutely no slop.  In use, the guide proves comfortable to use with all of my tools.

So far, my favorite thing about the guide is that there is only one slot in the jaws.  I use stop blocks to quickly set the honing angle for all of my tools.  So, I now I use the same set of stop blocks for all my tools.  The jig feels like it’s on rails when in use.  However, the narrow wheel allows you to create a cambered edge if that’s your goal.  I might be mistaken, but I believe I am able to pull a burr on a dulled edge more quickly with this jig than with others.  If correct, I attribute this to the tight tolerances to which Lie Nielsen manufactures the guide.  Finally, while the various accessory jaws are nice, they do require some fiddling.  It takes a few minutes to swap them out.

In conclusion, the Lie Nielsen honing guide meets all of my requirements.  It easily bests all the other honing guides I have used in the past.  The time and frustration it saves me while sharpening justifies its hefty price.  In fact, it has probably already paid for itself.


Dovetails on the Table Saw?

I’m currently building a Mike Pekovich inspired tool cabinet.  Mike built his cabinet for a Find Woodworking video series.  In the video series, Mike uses a custom ground blade to cut his dovetails on the table saw.  The idea is brilliant.  Tails are dead square, and you zip through them with lightning speed.  Additionally, the kerf of your table saw blade is the only thing that limits the size of your pins.  And because you only have to layout the tails on one board, you save a load of time on layout.

Consequently, I remembered meeting an associate from Ridge Carbide Tool at a recent woodworking show.  Like Forrest, they make various saw blades right here in the United States.  So, I checked out their website, and discovered they made dovetail table saw blades.  I placed an order, and was pleasantly surprised when the saw blade arrived just a few days later.

I purchased an 8-degree blade for left-hand tilt saws, but Ridge provides many other options.  They grind the bevel on one side, so you’re able to get deep into the corners of your tail boards.  This reduces that amount of paring required.  Additionally, the blade seems very well made.

Using the blade is simple.  Mark your pins.  Then, adjust the angle of your table saw to match the angle of your blade.  Next, adjust the height of the blade to baseline of your tail boards.  Finally, make a few test cuts, and cut your tails.  I like narrow pins, so I just align the blade to the center of the pin mark.  Then, I flip the board and align the kerf in the tail board to the kerf in my auxiliary sled.

Since I made an auxiliary fence specifically for tails, I mark the location of each pin on the fence.  I use the mark as a reference for the rest of my boards.  This keeps me from having to mark my pins of every board.

At the moment, I still cut my pins by hand.  However, that may soon change.  I am very happy with the Ridge Carbide’s product and the process of cutting dovetails on the table saw.


A Review: Make a Wooden Smoothing Plane

I spent the last six months building the workshop.  Yes, life blessed me with an amazing opportunity.  However, I grew tired of drywall, cabinets, and electrical.  I wanted a fun project.  So, when I stumbled across Scott Meek’s video, “Make a Wooden Smoothing Plane”, I decided to give it a shot.

You can buy Scott’s video as a digital download or DVD.  It provides over two hours of detailed instruction.  In addition, Scott includes a Sketchup template and detailed drawings.  The video starts with wood selection and milling.  Then, it walks you from shaping to troubleshooting.  Additionally, Scott provides you with excellent plane making tips along the way.  Furthermore, “Make a Wooden Smoothing Plane”, puts it in simple English that’s easy to follow.

Heck, even I was able to follow along.  In fact, I was able to make my wooden hand plane in just a few days.

The entire process is pretty simple.  First, you mill your cheeks and center assembly.  Then, you dry assemble the plane body.  Next, you cut your throat and ramp.  Then, you glue everything together.  Finally, you shape the plane body and troubleshoot.  While the most difficult part was cutting accurate tenons on the cross-pin, my first wooden plane was a success.

My only complaint, is that Scott doesn’t delve into plane iron selection or troubleshooting.  I choose the 2-inch wide, by 4 1/2-inch long iron from Ron Hock.  In conclusion, I highly recommend Scott Meek’s, “Make a Wooden Smoothing Plane”.  It provides excellent instruction and it’s a fun project.

You can find it at www.shopwoodworking.com

My First Cabinet Saw

Sawstop

I never thought I’d own a table saw.  I thought they were dangerous.  I thought they were for people who lacked the finesse to master hand tools.  It turns out, there’s so much you can do on a table saw that you can’t do with another tool.

I struggled between the European style sliders and the SawStop.  I decided on the Saw Stop Professional Cabinet Saw with 36″ table.  You can’t beat the European sliding table saws for accuracy and versatility.  However, the Saw Stop is better for me in terms of budget, size, safety, and available support.

That said, the Saw Stop is an excellent cabinet saw.  Assembly is straight forward (the manual is likely the best I’ve ever seen).  The fit and finish are superb.  The mobile base is easy to use.  So far, there’s nothing not to like.  I will give a more in-depth review after I’ve used the saw for a few months.  I’ve only made a few test cuts, but they were square and clean, even with the stock blade (I have a Forrest Woodworker II to try out later).  I also have a dado set on the way.

Stay tuned.  I will have a quick video of the Minimax FS30 in use very soon.

A Marking Knife to Rule Them All

Czeck Edge Pattern Pilot

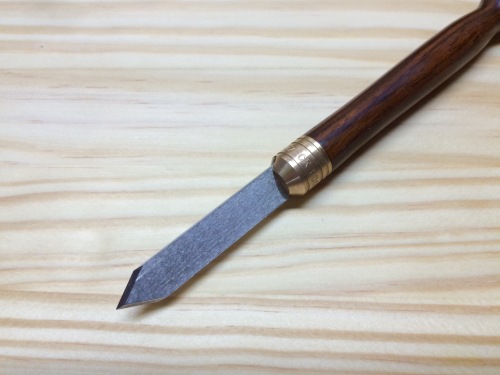
The Czeck Edge Pattern Pilot marking knife

The ability to accurately mark out stock is critical. Unfortunately, not all marking knives are created equal. I’ve been using the Pattern Pilot from Czeck Edge for a few months now and have grown to love it. It’s not perfect for every task, but it excels at those for which it was designed.

The Pattern Pilot has a 1-3/4″ long blade made from 0-1 tool steel. The tip forms a 65 degree spear-point from dual 40 degree bevels. The steel takes a very nice edge, and the blade is long and thin enough to fit into the tightest of places. The handle is turned from gorgeous cocobolo, and feels very nice in your hand. It quickly became my go-to tool for marking out dovetails.

The Pattern Pilot isn’t perfect for every task. For example, I prefer a knife with a shorter, more robust blade for marking across wide boards. My only other complaint is that honing these small spear-point blades is a chore. I think that is a skill that will improve with time.

Overall, the Pattern Pilot is joy to work with.  It excels at getting into tight places.  It’s comfortable to use and looks beautiful.

A Review: The Kell Honing Guide

The Kell Honing Guide

The Kell Honing Guide

I’ve probably been down every sharpening rabbit hole that exists. I’m always searching for the ultimate in terms of edge maintenance. It’s not all about the keenest edge possible. For me, it’s just as important to have a system that’s quick and easy to use. I’ve had a great system for my plane irons for a while. However, I’ve never been satisfied with the various systems I’ve tried for chisel maintenance.

For a while, I used the Veritas Mk II honing guide. It worked great, but that was fussy and took too long to setup. I turned to a cheap Eclipse knock-off guide to simplify setup. I still use it for my plane irons, but it tends to skew my chisels and doesn’t work for my narrowest blades. Next, I braved the world of free-hand sharpening. I had consistency issues, and felt that I had to regrind more often. This is due to the fact that you’re removing material from both the edge and the heal of the bevel instead of just the edge. It was about this time that someone recommended the Kell honing guide.

Stop block for setup

A simple stop block from a piece of scrap makes setup a piece of cake.

I was hesitant at first , due to the initial cost. On a whim, I made the short trip down to Highland Hardware and picked one up. I quickly fell in love. Using a simple stop block, it’s every bit as simple as the Eclipse style guides. It’s exceptionally well made, and always holds my blades square. It even works with my 1/8th inch chisel. My only complaint is that the design limits you to using the center part of your sharpening stones. As a result, beware of uneven stone wear and keep on top of your stone maintenance. Did I mention that this thing is beautiful?

Kell guide with 1/8th inch chisel

It even works great on very narrow chisels

I have no affiliation with Mr. Kell or Highland Hardware, but the jig can be found here: http://www.highlandwoodworking.com/kellhoningjig1incapacity.aspx