Blood, Sweat, and Sawdust

Going against the grain

Category: Tools

Drill and Driver Storage

Progress on the workshop feels slow.  It’s probably because I have taken on too many projects at once.  Fortunately, I crossed one project off the list last night.  I wanted something that would keep my drills and drivers off the ground; something that would keep them within reach.  I found plenty of inspiration on the Internet.  This drill and driver storage unit is what I came up with.

Drill and Driver Storage

I can store all of my drills and drivers in one place.  I store the chargers on top, and have a nice little drawer for all of my bits and accessories.  The unit mounts to the wall using a french cleat.  There is a small power strip secured below the top using adhesive Velcro.  The power cord for the strip passes through the side, while the power cables for the chargers pass through the top.

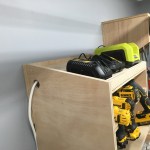
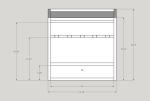
I made the entire unit from 3/4″ birch plywood, and I spent less than $50 for the entire build.  That includes plywood, drawer slide, drawer pull, and power strip.  I found everything at my local Home Depot.  If I hadn’t been tied up with other projects, this little drill and driver storage unit could have been built in a couple of hours.  Below, I will include the Sketchup and a couple of drawings.  Feel free to customize this for your own tools.

Drill-Driver Storage Sketchup

Stay safe and have fun.

MiniMax FS30 Change Over

https://www.youtube.com/watch?v=Oj8ojJUdxRo

Since taking delivery of the Jointer-planer combo, I’ve had a few people ask about the change over between jointing and planing.  The process is quick and easy.  In practice, it takes under a minute.  If I had the Euro guard it would be even quicker.  So far, I’m loving this machine.  It’s very well made and I haven’t made any adjustments to get it working properly.  Let me know if you have any questions about the Minimax FS30 change over.

My First Cabinet Saw

Sawstop

I never thought I’d own a table saw.  I thought they were dangerous.  I thought they were for people who lacked the finesse to master hand tools.  It turns out, there’s so much you can do on a table saw that you can’t do with another tool.

I struggled between the European style sliders and the SawStop.  I decided on the Saw Stop Professional Cabinet Saw with 36″ table.  You can’t beat the European sliding table saws for accuracy and versatility.  However, the Saw Stop is better for me in terms of budget, size, safety, and available support.

That said, the Saw Stop is an excellent cabinet saw.  Assembly is straight forward (the manual is likely the best I’ve ever seen).  The fit and finish are superb.  The mobile base is easy to use.  So far, there’s nothing not to like.  I will give a more in-depth review after I’ve used the saw for a few months.  I’ve only made a few test cuts, but they were square and clean, even with the stock blade (I have a Forrest Woodworker II to try out later).  I also have a dado set on the way.

Stay tuned.  I will have a quick video of the Minimax FS30 in use very soon.

The Beast is Out of the Cage: Minimax FS30 Initial Setup

Minimax FS30

Last night, I powered up the Minimax FS30 Jointer/Planer for the first time.

The Minimax FS30 initial setup is straight forward.  Minimax secures everything to a wooden pallet.  They even nail down the fence and accessories.  The real trick is getting her off the pallet.  This thing is heavy.

I stacked 2 x 8 scraps next to the pallet and carefully walking her off.  Once on the scraps, I employed the help of my lovely wife.  Check out her blog at sewsassycreations.com.  We lowered the Minimax FS30 to the ground by lifting one side and removing a board until she was all the way down.

Removing cosmoline is the most tedious part of the process.  Anyone who has ever received large machinery knows what I’m talking about.  I removed most of the goop with a plastic putty knife.  I removed the rest with lots of rags and a liberal amount of mineral spirits.  With the goop removed, I gave the beds a light coat of Boeshield T-9 and a coat of paste wax.  Don’t forget to get into all the nooks and crannies.  The cutter head and in-feed rollers hide lots of the stuff.

The Minimax FS30 doesn’t come with a power cord, so you will have to make your own.  I used a 10-2 rubber coated cable and 30a twist lock connector.  Everything hooks up to a junction box on the side of the machine.  There are two hot junctions and a ground.  It doesn’t matter which hot wire goes to which hot terminal.  Just make sure you connect your ground wire to the green ground terminal.

From there, it was just a matter of installing the knives and accessories.  These Tersa knives are great.  They install in a matter of seconds.

This thing purrs like an angry kitten.  I’m really impressed with the build quality.  The castings are beefy.  The base is constructed of heavy-duty sheet metal.  The fit and finish are excellent.  I haven’t been able to put her through the paces yet, but the initial cuts impressed me.  The only issues I’ve discovered is that the fence has a very small concavity along its width.  It’s very subtle and I don’t believe it will affect edge jointing in practice.

Stay tuned for a full review.


Embracing Electron Power: My Migration Towards Power Tools

I love my hand tools.  They’re soothing and cathartic.  But, the one thing I love more than using hand tools is designing furniture.  Eventually, I want to do this full-time.  If I want to take this passion full-time, I need to embrace electron power.   I need to focus more time on design and less on milling lumber.  My hand tools will always have a place in my work flow.

Minimax FS30

I start this migration with the purchase of a Minimax FS30 Jointer/Planer combo.  My single most tedious task is milling lumber by hand.  Milling by hand teaches you a lot about wood, but it consumes too much time to focus on design.  I purchased a combo machine, due to limited shop space.  This will be a solid investment.  Minimax has a proven track record and their corporate offices are very close to me.  I also considered Hammer, but ultimately decided to go with the FS30.

The new circuit has been run.  All I need to do is get her off of the pallet.  Free beer for any helpers!

Next, I will buy a table saw.  I love flexible European-style, sliding table saws.  However, most are out of my budget.  Sawstop is my second choice.  They build a solid saw with a proven safety record.  Following that, I will likely invest in a hollow-chisel mortiser.  I plan to build a lot of furniture with mortise and tenon joinery, so this will also come in handy.

It won’t all happen right away, but I will embrace the change and move on to bigger things.  Wish me luck!


How to Use a Sector

The sector is an excellent tool for proportioning your furniture designs quickly and accurately.  Last week, I showed you how to make a sector from an old folding rule.  I also discussed how to use it.  Despite its simple nature, I thought this discussion could benefit from some visuals.

How to Use a Sector

Align the sector

1. Start by aligning the sector with the edges of the space you are dividing.  Since I am dividing the space into 4, equal segments, I align it with the number 8 mark.Align a divider with the sector

2. Next, without adjusting the sector, align a divider with the proper marks.  In this case, it is the number 2 mark.

IMG_5854

3. Next,  walk off your divisions with the divider.

IMG_5855

That’s it.  Four perfectly spaced divisions.  And, it only took a few seconds to complete.  No complicated math.  Simple.

If you have any questions, don’t hesitate to let me know in the comments.  Now, go out there and find yourself an old folding rule.


Make a Sector from an Old Folding Rule


The Sector

How do you quickly divide an interior space of 17 5/8 inches into three equal parts?  With a sector.  Furniture builders and architects have reached for the sector often to quickly divide spaces.  Unfortunately, it’s a tool that has been largely forgotten in today’s machine driven world.

The sector is nothing more than a pair of folding arms used to create a series of proportional triangles.  To divide a space, line up the sector with one of the markings that is a multiple of the division you want.  For example, if you want to divide the space into four equal parts, you could use the four, eight, twelve…you get the point.  Then, just set a pair of dividers to the division you want.  If you selected twelve, align your dividers with the three.  If this isn’t entirely clear, don’t worry.  I will write another post detailing their use.

IMG_5763

To make the sector, start by marking the center point of your hinge, where the inside of each arm intersect.  I used an accurate straightedge to carry a line through with a pencil.  It’s critical that this is accurate.

IMG_5764

Then, walk your increments off with a pair of dividers.  You may have to use some trial an error here.  Twelve increments works great, due to the amount of whole number ratios you can get.  Unfortunately, my first step would have still be in the brass, so I went with eight for this one.

IMG_5765

With the increments stepped off, I carefully carried a line across both arms with a marking knife.

Completed Sector

From there, it was just a matter of filling in the lines for visibility and numbering my graduations.  Stay tuned for part two, where I will demonstrate the sector in use.

Click here for part 2 in this series: How to use a sector

Troubleshooting Holdfast Issues

https://www.youtube.com/watch?v=STiJx0VV36w

After boring the first few holdfast holes, I realized that I had serious issues.  My holdfasts simply weren’t biting.  Often, they were jumping around in their holes.  I had to find a solution, and fast.

The bench top is 4-1/2 inches thick.  The holdfast holes are 3/4 inch in diameter.  I am using Gramercy holdfasts.  They are very well made, and should survive years of abuse.  I did some research and determined that the most likely cause was the thickness of the bench top.  How could I resolve this with the holes already bored?

I received some excellent advice from my friends on Twitter and decided that I would counter bore the holes from the bottom with a large diameter hole.  To center the holes, I inserted a piece of 3/4 inch dowel.  After some trial and error, I determined that the most effective nominal thickness was around 3 inches.  The holdfasts work beautifully.  The solution was quick and easy.

I need to clean up the surfaces and coat everything in boiled linseed oil.  Then, I will finally be able to start my first project on the Roubo.  Stay tuned

You can find links to my other Roubo posts here:  Project Index

IMG_5420

Holdfast in action

A Simple Trick for Boring Accurate Holes by Hand.

I’ve always struggled boring accurate holes with hand tools.  I’ve tried using the “CD trick”.  I tried try-squares and mirrors.  I get close, but sometimes close isn’t good enough.  That’s when I came up with this simple trick (I’m sure I wasn’t the first one to use it): a guide block.

I first came up with this while drilling the draw-bore holes through the side of my top.  I have a drill press, but there was no way I could get the bench-top under the press.  Now, I’m using it to start my holdfast holes.

auger bit with guide block

Here’s how I made it:

  1. Find a piece of scrap that’s at least twice as thick as your hole and long enough to accept a clamp on either side of the hole.
  2. Joint an edge.  This will be the bottom of your guide.
  3. With the jointed edge down, bore your hole roughly through the middle of the opposite edge on a drill press (the table must be square to the bit).

You’re done.  I marked arrows on all four sides of mine to remind me which way to orient the guide.  A wider piece will yield more accurate holes, but may be harder to clamp to your work piece.

Crisp hole with bit and brace


Superior Hand Tools: The Bit and Brace

I’ve recently been using my vintage hand brace often.  I’ve discovered that there are many times when I prefer it to a power drill.  As long as your bits are sharp and you use a brace with the proper sweep, it doesn’t need much more physical effort than a power drill.  It’s easy to get crisp, clean holes and it’s a lot of fun to use.  It’s also nice not to have to worry about charging batteries all the time.  Watch the video below to see how easy it is to use a bit and brace.

https://youtu.be/PHX1N1rAjPc

Music is by ‘Hare and the Hounds’.  They just released their first album.  It’s a good one.  I highly suggest you check it out.