Blood, Sweat, and Sawdust

Going against the grain

The Mortise Jig

The Idea

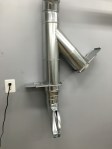
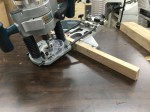
Above everything, I want to create beautiful and unique furniture.  The furniture which draws my attention has a common theme: mortise and tenon joinery.  Ideally, I would create mortises with a dedicated hollow-chisel mortiser.  Unfortunately, I don’t have the space or funds available for such a wonderful tool.  As a result, I have determined that my best course of action is to use the plunge router for mortising.

To improve speed and accuracy, I followed Jeff Miller’s advice and built mortise jig.  I followed Jeff’s design fairly closely, but made some minor improvements to the original plan.  For example, I added a t-track and adjustable stop blocks for better repeat-ability.
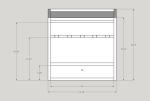
The Design

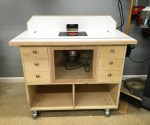
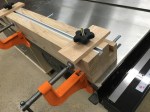
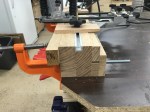
The jig is simple in design and easy to make.  It consists of a platform, a track, and a pair of hold-down clamps.  I milled an auxiliary fence for my router at the same time I milled the parts for the track.  This ensures a perfect fit to guide the router.

A 8/4 white oak board with too many knots for furniture sat on my lumber rack.  It had just enough straight grain to mill up the parts for the jig.  I laminated two pieces to make the platform.  Then, I cut a dado for the t-track.  I built the guide by resawing another strip of oak.  The resawed pieces produced three 3/4-inch strips: two for the guide and one for the auxiliary fence.

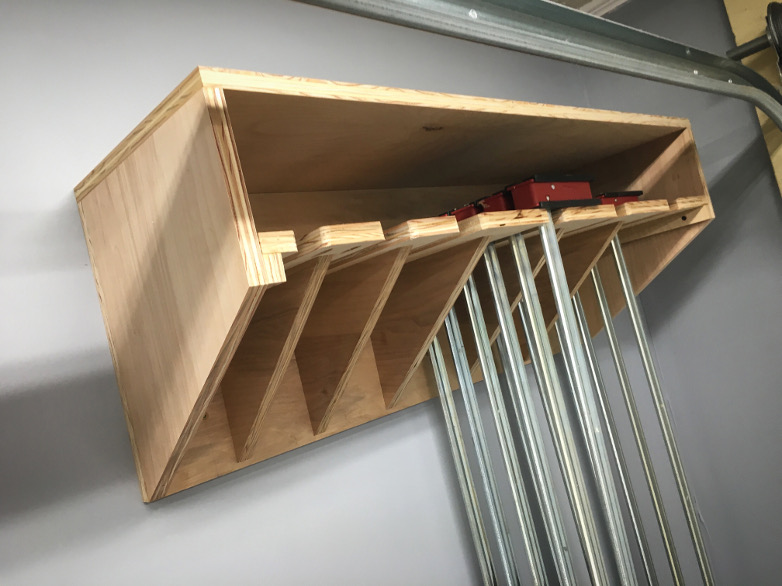
I glued the guide pieces together.  However, I did not permanently attach the guide to the base.  It attaches using 3/8-inch bolts that are also used to secure the hold-down clamps.  This allows me to replace the track if it wears out over time.

The Results

I eased the sharp edges with a block plane, and applied paste wax to the fence.  So far, the jig works extremely well.  I plan to use it on a few projects that I have coming up.  Stay tuned.


The Miter Saw Station

I consider the miter saw to be a rough tool and don’t need a dedicated station for it.  What I need is more storage.  Housing my miter saw and supporting large boards is icing on the cake.

The Design

I scoured the Internet for ideas.  I need good dust collection, therefore a dust shroud is a must.  I need more work surface, so a miter fence is out of the question.  It would only get in the way.  Most importantly, storage is at the top of my priority list, so drawers are better than shelves.  I didn’t find what I was looking for on the Internet, so only a custom design would do.

Miter Station 2

This is the design that I came up with: two separate cabinets, with a miter saw support in the middle.  Each cabinet has four drawers and an open space for larger tools.  A dust hood goes behind the miter saw and between the two cabinets (not shown).

The Build

I built the cabinet bases from 3/4-inch birch plywood.  For the tops, I used 3/4-inch melamine with oak trim.  I made the base runners from 4×4 material, and installed lag bolts for quick leveling of each cabinet.  I constructed the drawer boxes from 1/2-inch Sandeply plywood.  I used cheap drawer pulls and Blum style drawer slides.

With the cabinet’s complete, I began working on the dust hood.  I wasn’t happy with my first design at all.  The saw interfered with the hood, and it missed a lot of dust.  As a result, I moved the dust port lower, and built a larger hood.  I am much happier with my second design.

I hope that this is the last batch of shop cabinets I’ll be making for a while.  With the miter saw station complete, it’s time to start building some furniture!  Stay tuned.

Building the Perfect Router Table

I experienced a love hate-relationship with my small, bench-top router table.  I regretted selling it, but it was a pain to use.  I promised myself that I would build a better one as soon as I got moved into the new shop.  That’s exactly what I did.

Router Table

Finding inspiration in Norm Abram’s Deluxe Router Station, I designed a custom table that exceeds the capabilities of the best pre-built options.  It has an integrated lift and a dedicated motor (no more pulling the motor for plunge duties).  It also has a large top, sturdy fence, and excellent dust collection.  Better yet, it has lots of storage and is completely mobile.

I made the base from 3/4-inch birch plywood.  I constructed the case using dado joints.  This makes a sturdy base that is easy to glue-up.

I made the top by laminating two sheets of MDF and covering that with a thin sheet of laminate.  Then, I trimmed it with oak and cut dados for a miter slot and t-track.  I finished the top by cutting the hole for the router lift.

I enclosed the motor with a small frame-and-panel door.  The frame is from oak and the panel is a small piece of Lexan.  The door is held in place using magnetic door stops.  I love that you can see all the mechanics through the Lexan panel.

The table collects dust using a 4-inch port on the base and a 2.5-inch port on the fence.  I built a small ramp inside the base with a hood below.

So far, I’m very happy with the build.  The Jessem Mast-R-Lift works flawlessly and it’s nice to have a powerful, dedicate router motor.

I have included the SketchUp at the following link: Router Table

Drill and Driver Storage

Progress on the workshop feels slow.  It’s probably because I have taken on too many projects at once.  Fortunately, I crossed one project off the list last night.  I wanted something that would keep my drills and drivers off the ground; something that would keep them within reach.  I found plenty of inspiration on the Internet.  This drill and driver storage unit is what I came up with.

Drill and Driver Storage

I can store all of my drills and drivers in one place.  I store the chargers on top, and have a nice little drawer for all of my bits and accessories.  The unit mounts to the wall using a french cleat.  There is a small power strip secured below the top using adhesive Velcro.  The power cord for the strip passes through the side, while the power cables for the chargers pass through the top.

I made the entire unit from 3/4″ birch plywood, and I spent less than $50 for the entire build.  That includes plywood, drawer slide, drawer pull, and power strip.  I found everything at my local Home Depot.  If I hadn’t been tied up with other projects, this little drill and driver storage unit could have been built in a couple of hours.  Below, I will include the Sketchup and a couple of drawings.  Feel free to customize this for your own tools.

Drill-Driver Storage Sketchup

Stay safe and have fun.

Workshop Complete

It’s done; at least as done as a shop can ever be.

I will blow insulation into the attic space and build some storage units.  Aside from that (and the inescapable shop evolution) It is finished.

Completed Workshop

With the help of my awesome father, I moved everything I had in storage into the new workshop.

Clamp Rack

Now I can start building.  Speaking of building, I built an awesome clamp rack.  This one can hold more clamps than my old one and takes up less wall space.  I got the idea from Brad at Fix This Build That.


I also installed a wood rack and fire extinguisher.  I’m considering adding a second extinguisher on the other side of the shop.  You can never be too careful.

I also made up a custom dust fitting for my Minimax Jointer/Planer.  I used a 4″ Fernco fitting and a 5-to-6 inch reducer.  The Fernco fitting fits snug over the 120mm European port.  The 5″ side of the reducer fits over the Fernco fitting.  I used silicon adhesive and HVAC tape to secure the Fernco to the reducer.

For my first project, I will build a custom router table complete with a Jessem Mast-R lift and dedicated motor.

Thanks to everyone who helped me with this project.  I will have a few follow-up posts that relate to the shop build, so stay tuned.

For the rest of the workshop build, check out the garage workshop build index.

Dust Collection: Machine Drops

I intended to publish this post a week ago.  Unfortunately, a nasty cold kicked my butt instead.  I planned to be finishing up new shop cabinets.  Instead, I’m just now starting to feel well enough to get back into the shop.  Such is life.

I planned my duct work for three main machine drops: one on either side, and one in the middle.  Each drop will service at least two tools.  The central drop will service my table saw and jointer/planer.  One side drop contains a floor sweep and flexible port.  The other side will service a miter saw and flexible port.

I was concerned about the stability of the central drop.  So, I secured strut channel to two joists and braced the drop to the strut channel.  This adds a lot of rigidity to the drop and supports some of the weight.   Plus, I think it looks a lot better than using dimensional lumber.

I replaced all of my sheet metal screws with rivets and sealed all the joints with silicone caulk.  I tested the cyclone with the ducting installed and I’m amazed by the suction.  The system is also much quieter with the duct work.  My wife was very happy about this.  I no longer have to worry about making a bed in the shop!

Complete Ductwork-web

I still need to blow insulation into the attic area, build a router table, and miter saw cabinets.  Stay tuned.

For the rest of the workshop build, check out the garage workshop build index.

Sheet Metal Screws vs Rivets for Ductwork

While finishing the ductwork for my dust collection system, I ran into a dilemma.  The sheet metal screws protrude into the ducting more than I was comfortable with.  I used the shortest screws I could find.  However, the length of the screws concerned me that chips might snag on screws and lead to bigger issues.

The alternative is pop rivets.  They look much nicer and protrude less into the interior of the ducting.  The only major drawback is that they are slightly more permanent.  In practice, they aren’t that difficult to remove.  Select a drill bit that’s about the same size as the rivet head and drill it off.  To install, simply drill a hole that’s the same size as the rivet.  Insert the rivet post into the gun, the head into the hole, and then squeeze the handle until the post snaps off.

All you need is a rivet gun and some pop rivets.  The rivets I used are 1/8-inch by 1/8-inch.

Rivets for Ductwork

In the end, I definitely prefer rivets for duct work.  Just make sure you’re comfortable with everything before installing them.

Stay tuned.  I’m about 95% complete with my ductwork and should have another post in the next day or two.

For the rest of the workshop build, check out the garage workshop build index.

Dust Collection: Snap-lock Ducting

Snap-lock ducting offers a great compromise between affordability, durability, and ease of install.  Fittings and adapters are easy to find locally and online. The only tools needed are a HVAC crimping tool and an offset tin shear.  I purchased both for less than $25.

I am using Gripple’s Hang-Fast system.  It makes hanging your ductwork a breeze.  Simply, hang the loop on an eye-bolt or j-hook.  Then, slide one end of your wire through the grip.  Loop the wire around and insert it through the other end.  It’s self-locking and can be loosened using a supplied key.  I am very happy with this product and would use it again in a heart-beat.

The straight pipe goes together easy enough.  Cut the pipe to length using a pair of offset shears.  Then, snap the seam together by starting at one end and working down towards the other.  Once snapped together, it helps to drive a self-tapping sheet-metal screw near each end.  You could also use pop rivets.  Finish each section by crimping one end.  The crimped ends should always point back towards the collector.

I secured each section and fitting using a couple of sheet metal screws and then sealed all the seams with clear silicon caulk.

I’m currently about two-thirds of the way complete with my ducting.  Even with ample planning, it’s hard to know exactly what you’ll need until after you get started.  I am short a few fittings and patiently wait for them to arrive.

Stay tuned.

For the rest of the workshop build, check out the garage workshop build index.


Dust Collection: Installing the Super Dust Gorilla

Good dust collection is a productivity saver.  Good fine dust collection is a lung saver.  That’s why I invested money into a powerful dust collector with pre-separation.

I did a lot of research and decided on the Super Dust Gorilla from Oneida Air.  It has a powerful 3hp motor, cyclone separator, and HEPA filter (filters 99.97% of .3-.5 micron particles).

I have nothing but good things to say about the great people at Oneida Air.  They were fair and very helpful.  Their product is extremely well made and made entirely in the USA.

Bracket and Cone-web

I opted for the wall bracket.  Initially, I attached the bracket to two studs.  I was a concerned about durability so, I tied in two more studs using 2×6 cross-braces.  This feels much more secure.

Improved Bracing-web

Then, I assembled the barrel to the fan housing, and the motor to the fan housing.  The top half of the assembly weighs well over 100 lbs.  Attaching it to the cone on the bracket was not easy for two able men.  Do not attempt this by yourself.

Barrel Assembly-web

Barrel and Cone-web

Then, I simply attached the filter using the supplied hardware.  I replaced the supplied plug with a L6-30 twist lock.  I had an issue with the bolts used to connect the filter plenum to the fan housing.  They were too short.  This is due to the gasket material used between parts.  They might have worked if I had clamped down the flange to compress the gasket.  Instead, I went out and spent a few bucks on longer screws.

I did a quick fire with everything attached using the optional remote control.  Everything works flawlessly.  I can’t believe how much air this thing pulls.  I’m looking forward to a dust free work area.  I just need to get the ductwork installed.

Please, check out Oneida Air at www.oneida-air.com

Super Dust Gorilla-web

For the rest of the workshop build, check out the garage workshop build index.

Garage Workshop Build: Installing a Mini-Split Ductless Air-conditioner

No more sweating profusely over expensive cast iron tools.  No more miserable summer days in the shop.  All thanks to my Mitsubishi mini-split ductless air-conditioner and the nice HVAC guys who turned up the system yesterday afternoon.

Cool-Silence-web

Ductless, split heat-pumps (also known as mini-splits) are the new standard in efficient heating and air.  These consist of an indoor unit (found in wall mount, flush-mount, and ceiling mount varieties) and an outdoor unit.  They are more expensive than tradition units, but pay for themselves with reduced energy costs.  Their benefits include, but are not limited to: reduced energy costs, less noise, and improved comfort.

If you’re thinking about getting one for your workshop, do the legwork yourself to offset some of the cost.  I installed my system for about half the cost a professional quoted.  I purchased my equipment from a reputable online seller and had professionals test, vacuum, and connect the lines.

Wall Bracket-web

The indoor unit mounts to a wall bracket.  I attached the wall bracket using five screws.  I secured two screws to studs, and the others into drywall anchors.  The wall bracket includes a guide that helps you locate the 3″ hole you will need to drill through your wall for the refrigerant lines.

Cooland Hole-web

Wall Sleeve-web

Once I had the bracket mounted, I carefully drilled my hole and installed a wall sleeve that came with my installation kit.  The hole should slope slightly downwards to make sure drainage from the condensate line.  Then, I passed the refrigerant and condensate lines through the hole and attached the indoor unit to the bracket.

Indoor-Unit-web

Next, I installed a line hide kit on the outside of the house and connected all of my electrical wires.  The installation kit I purchased from the online retailer included both wires I needed.  One connects the outdoor unit to the disconnect box.  It uses water proof connections and supplies power to the entire system.  The other wire connects the outdoor unit to the indoor unit.  The terminals on both units are color coded and hard to mess up.  I also installed a surge protector to the disconnect for added security.

Line-Hide-web

Disconnect Box and Surge Protector-web

I installed the outdoor unit on an equipment pad.  It’s made of hard plastic and does a good job of stabilizing the outdoor unit and absorbing some sound.

It took the HVAC professionals about an hour and a half to connect the refrigerant lines and turn up the system.  The system works flawlessly.  It’s so quiet, it’s hard to even tell when it’s running.

Mini-Split Ductless Air-conditioner

I purchased all of my equipment from www.eComfort.com.  I am very happy with the service I’ve received from them so far, and highly recommend them.

For the rest of the workshop build, check out the garage workshop build index.