
The Bogg’s Shave Horse: Ratchet and Key
The placement of the ratchet key worried me. If installed incorrectly, the lower jaws won’t work properly on the shave horse. Unfortunately, I hadn’t received any good instruction on how to locate it. In the end, I devised a good solution that I think will help anyone building a similar shave horse. Keep reading to see how I did it.
Ratchet and Key
First, I built the ratchet, and installe the guide block. This shouldn’t require much explanation. Unfortunately, I hurried this part of the build. As a result, it ended up much more difficult than it should have been. Don’t be like me!
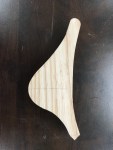
Next, I used a set of drafting curves to sketch out the shape of my ratchet key. It needed to be long enough to easily reach the handle. Mine ended up 8 inches long and about 4 inches high. Then, I cut the key on the band saw and cleaned it up on the spindle sander. I left extra material on the pin end, to ensure a tight fit in the ratchet.
To find the correct location for the key, I did the following: First, I marked the center-line on the key and the point for the dowel. Then, I placed the key on the base, and transferred the center-line to the base. I also used the notches in the ratchet to mark the pin on the key (this is why I left extra material on the key, earlier). Finally, I transferred the line on the base down both sides.
-
- Mark the centerline and dowel location on the key
-

- Place the key on the base and transfer the line. Also, use the ratchet to mark the final shape of the pin on the key.
-
- Determine the correct height, by lowering the key while keeping your lines together.
-

- Drill your holes, drive your dowel, and test the fit.
Next, I removed the ratchet and inserted the key. I carefully determined how low I wanted the key, and marked a second line. Then, I measured the distance between the second line, and the horizontal line for my dowel. This determines how far down the dowel will pass through the base. Finally, I transferred this measurement down each side of the base and drilled my holes.
I did not glue in the dowel. I want to be able to remove it later, if necessary. Instead, I waxed the dowel and drove it through with a dead-blow mallet. Next, I will tackle the treadle and seat. Stay tuned.


