
Better Hand Plane Storage
by Patrick Harper - Blood, Sweat, and Sawdust
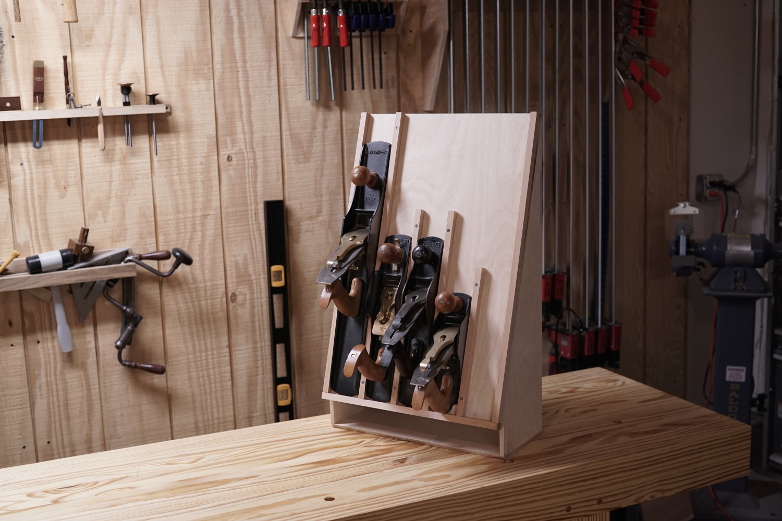
For the past year, my hand planes have sat on a little mobile cabinet near my work bench. Here, they collected fine dust from my electron powered machines. It wasn’t until after the weather started getting hot and humid again that I started to notice a few specs of rust here and there. It was nothing that I couldn’t easily remove, but it got me seriously reconsidering my hand plane storage.
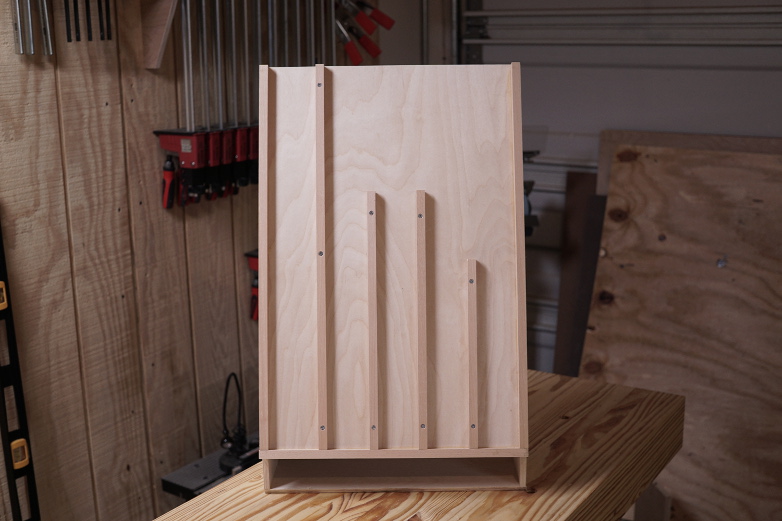
The goal is to create a nice hanging tool cabinet with doors, but it all starts with a plane till. For now, the till will be hung on the wall using a french cleat. Later, I will fasten it to the inside of the tool cabinet. It only took about $25 and a few hours to finish. It won’t be a huge loss if I decide to redesign it for the finished tool cabinet.
The ramp angle is fairly steep to save depth. I will better secure the planes before mounting it to the wall. I’m having a hard time between trying magnets glued to the back to the till ramp, or cleats. Cleats are more secure, but less attractive. What do you think? Any options I haven’t considered?

I’ll detail the tool cabinet in a future series. Mike Pekovich’s hanging tool cabinet formed the inspiration for this project.
I haven’t finalized the details, but I’m thinking that I will build it out of cherry with mahogany door frames. Stay tuned.

If you have the time, check out Andy Rae’s tool cabinet.
Thanks. I’m always looking for new ideas!
One of these is working it’s way up my “to-do” list and I like this simple design. I’ve put it off because I too have been back and forth about securing the planes. I thought about putting a dado or two in the back and gluing long bar magnets in place, but I think I’d seep better at night with cleats.
James, you’re probably right. I’ve also considered leather shoe laces to go around the front knobs. I’ve seen others do this.
If you had ripped a bevel on the bottom edge of the nailer at the top, you could hang it on a french cleat and it would be flush with the wall. I like the look of this piece, I might make one myself 🙂
It might be hard to see, but I did cut a bevel on it. I have a matching piece that I will nail to the wall. The till will just sit on the cleat.
My bad – “For now, the till will be hung on the wall using a french cleat.” It was late last night when I was reading this. I misunderstood the whole article apparently.
Haha, no worries.
The 1/2″ magnets work great even on a vertical surface. Counter sink them into the face and glue and you should have no problems.
I think I might use a combination of cleats and magnets. I bought some 3/4″ rare earth magnets. They’re incredibly strong, but not strong enough through the 1/2 top. I think counter sinking them, like you mentioned, will help a lot.
I’d be a little concerned about magnets – not sure if they will tend to magnetize the sole of the plane over time and whether that would be a problem or not. I’ve seen a couple steep racks that have rawhide/leather loops that go over the knob at the front of the plane. Another option would be a wooden “lip” at the top and bottom of each plane – like the top of a Japanese toolbox. You have to lift the plane up to swing the bottom out of it’s lip, then drop the plane down to clear the lip at the top. It’s simpler than it sounds – look up “Japanese toolbox” on youtube and you’ll see what I mean.
That is a lovely storage rack for your planes. What do you do with your specialty planes (Plow, rabbit, router)? How about planing up some larger stock and giving the gooseneck splice a try…
Gabe, that’s exactly what I plan to do. For now, I can slide most of them up under the deck on the lower shelf. It’s not convenient, but it works. I ran out of plywood and couldn’t make the shelf any taller. I’ll probably rework this for my full cabinet.