A Bench Crafted Moxon Vise
by Patrick Harper - Blood, Sweat, and Sawdust
While building my tool cabinet, I discovered a major issue with my workbench. It sits too low for detailed work. After several nights of dovetailing, I began to develop a back ache. I needed something that would bring my work closer to my eye. I needed a Moxon vise.
A Moxon vise is a twin screw accessory vise that sits on top of your workbench. Joseph Moxon described such a vise in his quintessential “Mechanick Excercises”. As a result, others started referring to similar devices as “Moxon vises”. The vice fastens to your benchtop using holdfasts or clamps and is stored below the bench top when not in use. Since, I’ve been very happy with my Bench Crafted leg vise hardware I decided to give their Moxon vise hardware a shot. The Bench Crafted Moxon vise hardware consists of two handwheels, two acme screws, four nuts, and a nice piece of suede. Everything in the kit exudes quality.
The Build
First, I milled up some 8/4 ash for the jaws and stabilizer. Then, I drilled a counter bore in the fixed jaw. The counter bore will receive one of the large nuts. Next, I drilled the hole for the acme screws. Then, I drilled elongated holes in the moveable jaw and attached a stabilizer to the back of the fixed jaw. That’s it. The basic build is very simple. However, give me enough time and I will overthink everything
Instead of the basic square mortise for the nut, I decided to try a cleaner, hexagonal mortise. To start, I made my counter bores slightly smaller than the provided nut. This allowed me to thread a nut onto one of the acme screws and place the nut over the counter bore. Next, I traced the nut on to the fixed jaw using a marking knife. Then, I chopped out the corners with a sharp chisel. I think the results speak for themselves.
-

- The round counter bore is slightly smaller than the nut
-

- The acme screw helped me to stabilize the nut over the counter bore, so I could more easily mark it out.
-

- A sharp chisel made quick work of the corners.
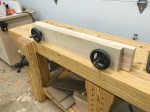
Additionally, I decided that I wanted a nice bevel on the front of the movable jaw. And, what better compliments a stopped bevel than a lamb’s tongue transition? To create the lamb’s tongue transition, I started by making a template. Then, I used the template to mark out its location. From there, I used a carcass saw to sever the grain at the transition. Then, I simply hogged out the waste with a chisel and mallet. Finally, I cleaned things up with a rasp and sand paper. I over cut in a few areas, but I think this turned out well for my first attempt.
-

- Using a compass and straight edge, I marked out a template
-

- I cut the template on the bandsaw and cleaned it up on a spindle sander
-

- Then, I marked out the location of the lamb’s tongue using the template
-

- Finally, I made several crosscuts using a carcass saw, and wasted out the material with a chisel and mallet.
I hate contact cement. So, I searched for an alternative. During my search, I discovered adhesive cork board. My local Home Depot carried it. So, I decided to give it a shot. I only attached the cork to the inside of the movable jaw, but I think this will be sufficient. It’s easier to apply than suede and without the noxious fumes of contact cement. Finally, I applied a few coats of shellac and wax to the outside faces of the vise. I’m very happy with the results. The Bench Crafted Moxon vise hardware does not disappoint.