
A Few Tips for Workshop Demolition
by Patrick Harper - Blood, Sweat, and Sawdust
Workshop demolition isn’t difficult. Hell, it’s downright fun. However, have a plan before you get started.
I removed all the drywall on two exterior walls of the workshop to make my life easier. With the drywall removed, installing electrical, insulation and a new exterior door is much easier. Here’s a few tips I discovered along the way:
- Have a plan for waste disposal. Dumpster rentals are often expensive. My cheapest option was to take a truck load to the local dump.
- Be ready for the unexpected. I discovered several sizable holes in the exterior sheathing that needed patched.
- Don’t go Wreck it Ralph. It works for the home-improvement shows, but it will make more work for you….especially if you’re working with drywall.
- Use a utility knife and cut the drywall tape in all of your corners. Not only will this make removal easier, but it will also prevent you from damaging any surfaces you aren’t demoing.
- Expect critters, especially in a garage. Have some bleach and water in a spray bottle, ready for cleanup.
-

- Cutting down the wall with a drywall saw, simplifies drywall removal.
-

- What you don’t want to happen.
-
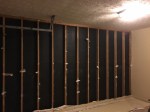
- One wall complete
-

- A hole in the exterior sheathing.
-

- Hole patched.
Have a plan and your workshop demolition will be a success. With demo work complete, I framed in an exterior door and roughed in my electrical. More on that to come.
For the rest of the workshop build, check out the garage workshop build index.
