
Insulating a Garage Workshop: Part I
by Patrick Harper - Blood, Sweat, and Sawdust
The light at the end of the tunnel, finally! My hands are a little sore from securing around 400 staples. However, insulating a garage workshop was one of the easiest tasks I’ve completed so far. I suggest you try this yourself as opposed to hiring it out.
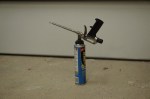
Before installing the batts, I sealed all the seams in the sheathing with spray foam. I also patched a few large holes with plywood. After struggling with the disposable cans, I opted for the professional gun. It allows you to control the bead of foam with precision. You’ll finish the job with cleaner hands. I also sealed the gaps between the door jamb and frame. Here, I used a low expanding foam specifically designed for windows and doors.
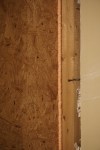


With the workshop air tight, it was time to install some insulation.
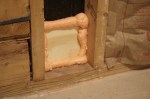
I cleaned off a large section of the floor for a work area and got to work. I’m not too keen on being itchy, so I used some long gloves while working with the fiberglass. I decided to use rolls on kraft-faced R13 installed of pre-cut batts. I measured my stud bays and cut the rolls using a utility knife. I found that compressing the roll over a 2×4 scrap made cutting in a single pass a breeze. I used an engineering square to make sure my cuts were square. I also used the story stick from when I ran electrical to score part way through the back of the insulation where I had horizontal cable runs. You want your wires to fit into the insulation as opposed to compressing it.

I waited until my batts were installed before I cut out for my electrical boxes. Then, I secured the batts to the studs using staples. The rolls have flanges that fold out to make sure a continuous vapor barrier along your wall. I overlapped the flanges and stapled. And I stapled, and stapled. My hands are still sore today. I should have invested in one of the hammer style staple guns.
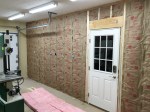
I still have to decide on what to cover the walls with. I’ll probably go with 5/8 drywall. Then it’s on to conditioning the space. Stay tuned!
For the rest of the workshop build, check out the garage workshop build index.

I would recommend trying not uto use drywall(unless you like patching holes). Plywood is more expensive but it also can be screwed into and takes a lot more of a beating. 1/2″ would work but 3/4 would be nearly indestructible.
I have to maintain Drywall for the fire rating since this is an attached workshop. Plywood would be bad for code and insurance.
Understood. Enjoy the rest of your build!
Thanks a lot for the feedback!
I would check the local building codes. Some require fire rated sheetrock on the party wall with the house and garage. Your insurance company is another good source to touch base with here.
That’s the direction I’m leaning. I’ll most likely go with 5/8th inch fire rated sheetrock. I got a quote for the two walls which was just over $1000. I think I’ll be doing this myself.
Good time of year to insulate! I just finished having some energy audit work done and they air sealed and batted the sill around my basement and it made it much more comfortable to work in. I Don’t need the space heater on as often.
What part of the country are you located?
Looking forward to reading more here too 🙂
I’m located in the south east US. Heat and humidity are my biggest enemies!
aha, I am up north in MA where its cold and humid! The dehumidifier certainly makes it much more comfortable and stable for wood…I regard that as one of my better purchases, haha.
I bet. I’ll have the same issue down here. I’ll be getting a mini-split heat-pump once the drywall gets put back up. I can run it in dry-mode and remove a great deal of the moisture.